
In the ever-evolving digital landscape, user experience remains paramount. Simplifying authentication processes is crucial for enhancing user engagement and satisfaction.
For example, sometimes when we are sending an email to a customer we’d want to skip authentication and open the desired page straight away.
In those cases Magic Links come to help!
A magic link, also known as a one-time login (OTL) or passwordless login link, is a unique, time-sensitive URL sent to a user’s registered email address as a secure means of authentication. This link, when clicked, automatically logs the user into their account without requiring them to enter a password.
Most common way of generating them is to have a separate custom object that manages “token”. Magic Link would contain said token and point to a public page with Apex Controller which validates it in the background and operates in “without sharing” mode as System to get further information and display it to users.
While this method does work, it creates a lot of room for mistakes and potential data exposure. It also doesn’t actually create a proper user session with Salesforce, which prevents users from freely browsing Community further.
So is there a better way?
Well, there is a frontdoor.jsp endpoint which can accept access_token from an OAuth authentication with web scope and convert it into a valid Web Session:
https://instance.site.com/secur/frontdoor.jsp sid=ACCESS_TOKEN&retURL=RELATIVE_URL_TO_OPEN
We can’t share users’ actual access_token as we might not have it during link generation and we can’t dynamically control its expiration, but we can use OAuth 2.0 JWT Bearer Flow to generate it without user interaction!
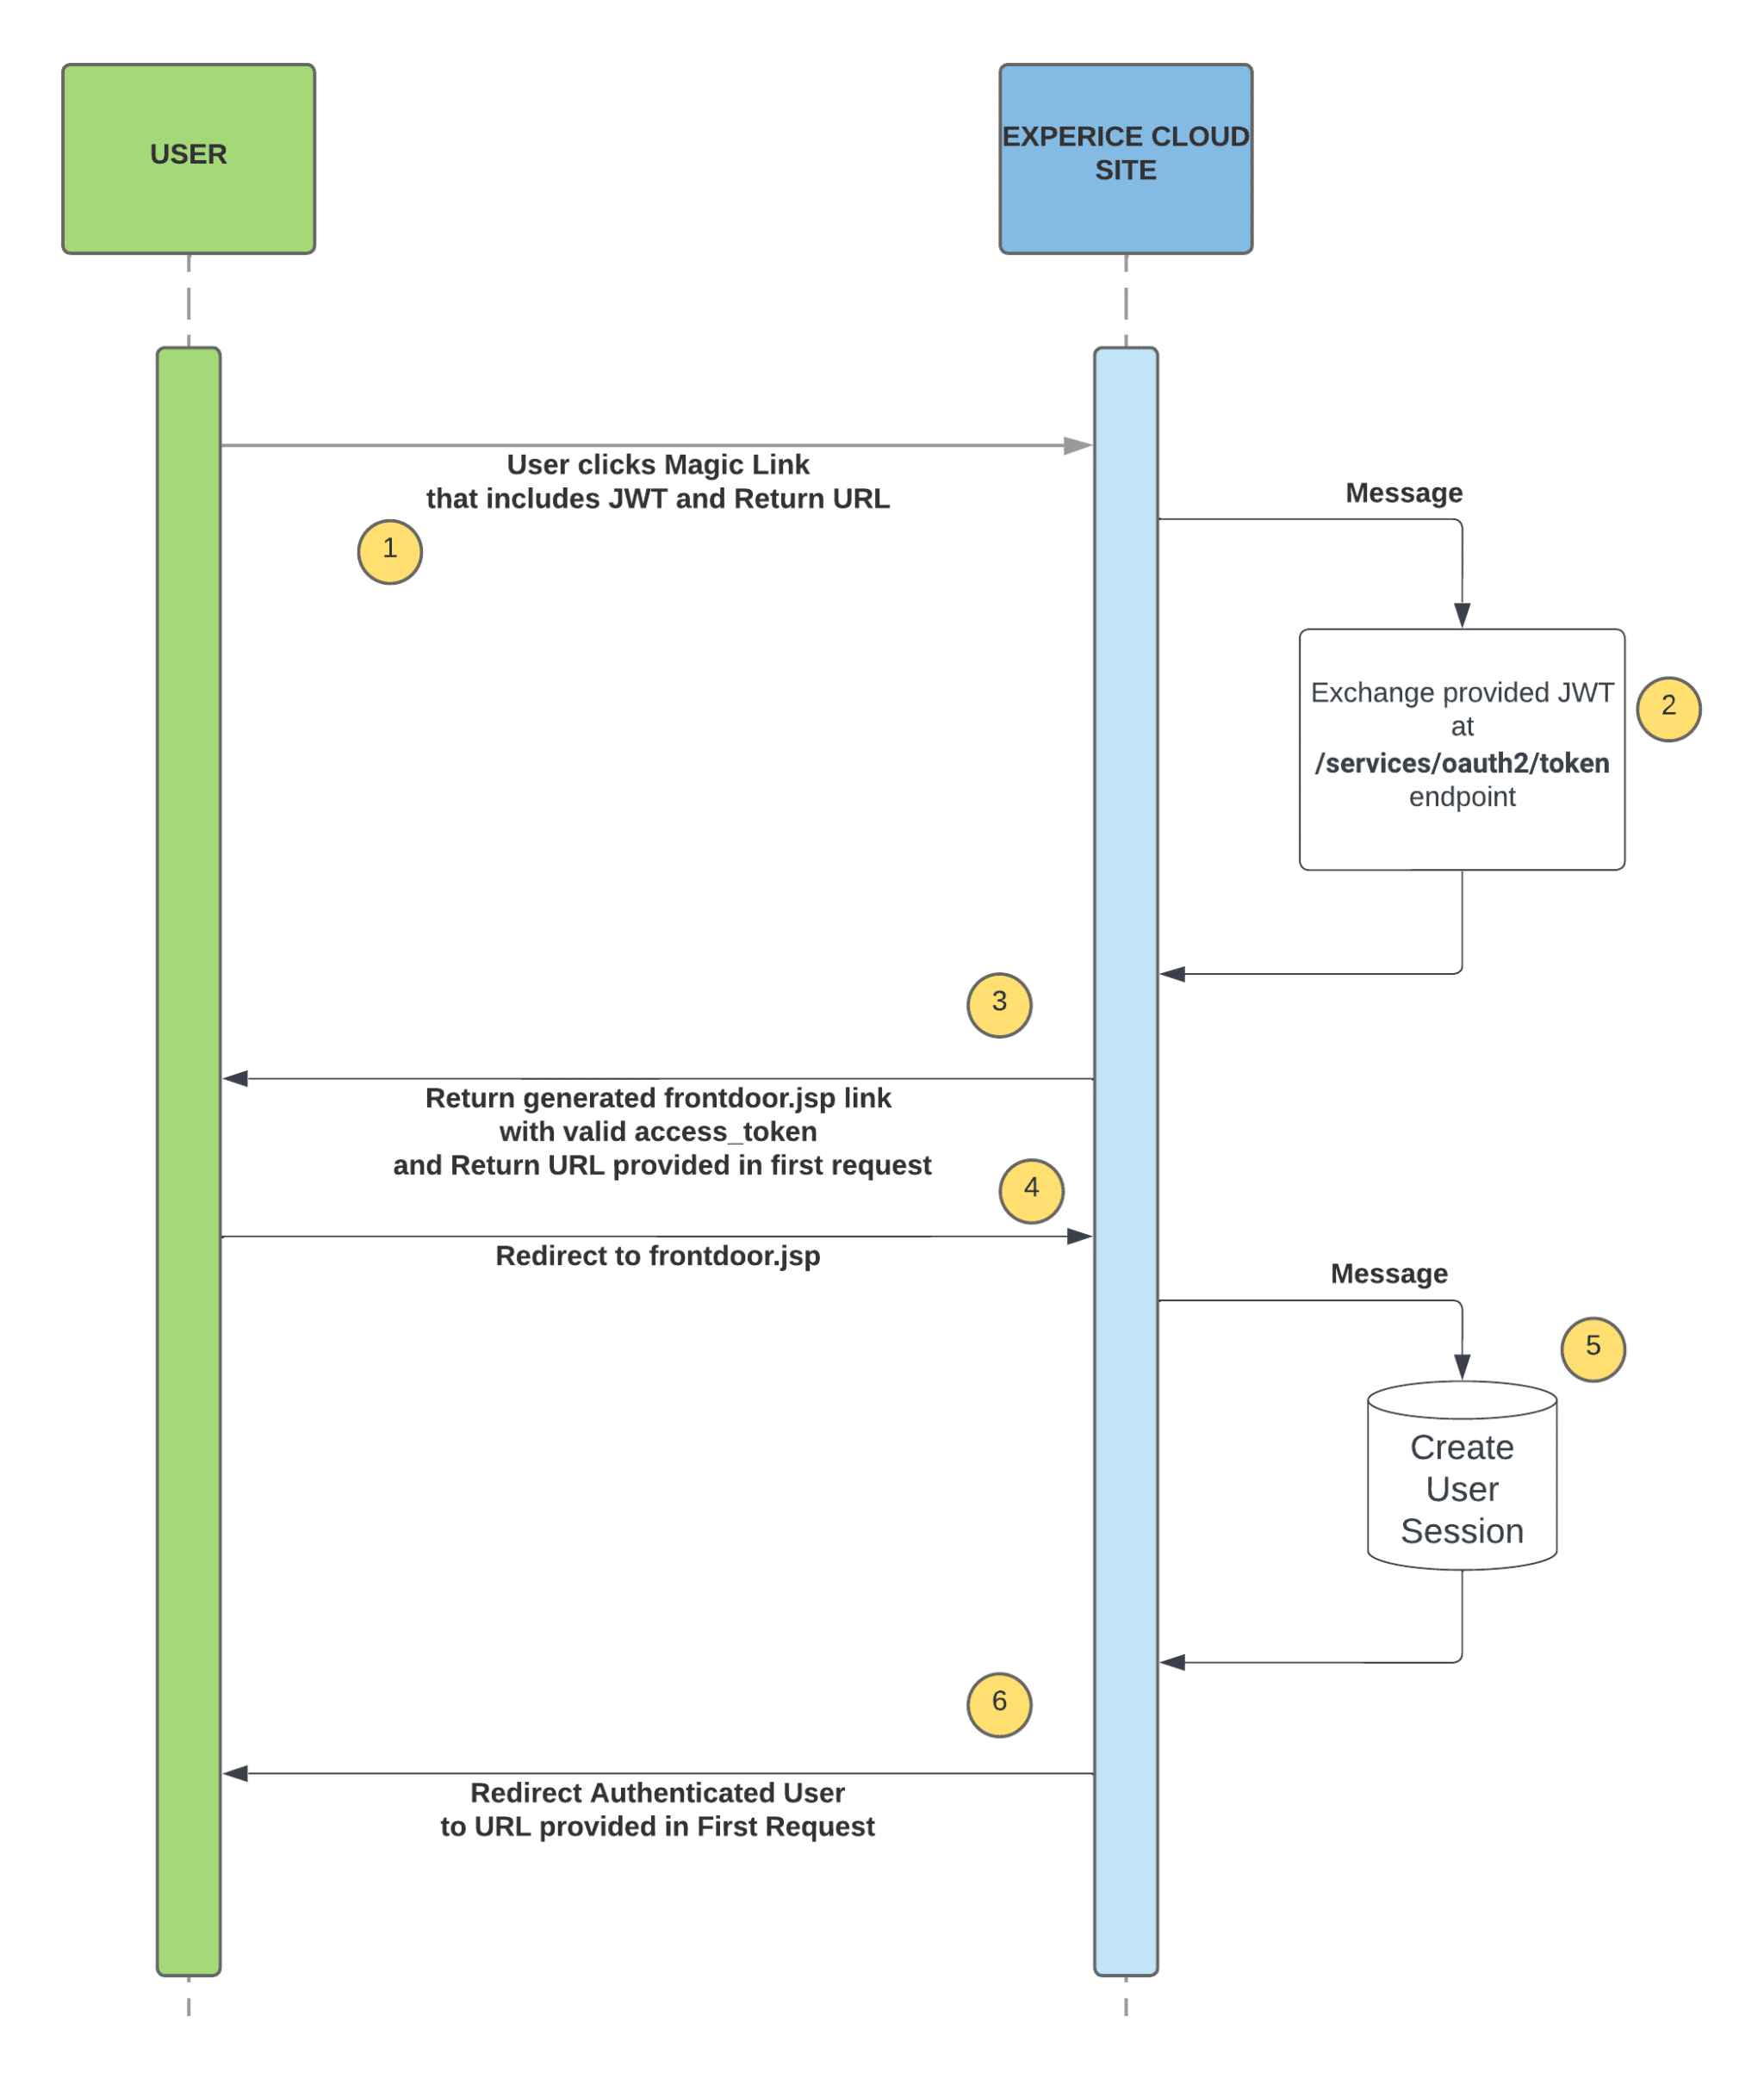
This is how end flow will look like:

To generate a JWT token that will be sent to a customer within Magic Link, we’ll need to set up an OAuth 2.0 JWT Bearer Flow.
Let’s start with creating a certificate that will be used for signing our JWT tokens:
Next, we’ll create Connected App:
In order for users to be able to authenticate via this Connected App we need to give them access. It is best done via assigning Permission Sets with access to Connected App to users.
Setup is complete, now we can easily generate JWT’s for given user in Apex Class:
					private static String getJwtForUser(String username) {
	Auth.JWT jwt = new Auth.JWT();
    jwt.setSub(username);
    jwt.setAud(COMMUNITY_URL);
    jwt.setIss(CLIENT_ID); //Client Id of Connected App created in previous step
    jwt.setValidityLength(VALIDITY); //How long this jwt should be valid for

    //You could also add additiona information with jwt.setAdditionalClaims() which will also be signed and secured

    Auth.JWS jws = new Auth.JWS(jwt.toJSONString(), CERT); //Certificate Unique Name created in previous step

    return jws.getCompactSerialization();
}
Now that we have a process of creating JWT’s, we need an endpoint that will accept it and return a valid frontdoor.jsp URL. We can’t use standard /services/oauth2/token because it accepts only POST requests and we won’t be able to do that from Email.
Lets create an LWC that will process incoming parameters and trigger redirect to frontdoor.jsp:
					import { LightningElement, wire } from 'lwc';
import processMagicLink from "@salesforce/apex/MagicLinkController.processMagicLink";
import { CurrentPageReference } from "lightning/navigation";

export default class MagicLink extends LightningElement {

    @wire(CurrentPageReference)
    currentPageReference;

    handleRedirect() {
        processMagicLink({
            jwt: this.currentPageReference.state['token'],
            retURL: this.currentPageReference.state['retURL']
        }).then(result => {
            window.open(result, "_self");
        }).catch(err => {
            console.log(err)
        });
    }
}
And Apex Controller method for it:
					@AuraEnabled
public static String processMagicLink(String jwt, String retURL) {
        //Post the JWT to token endpoint
        String accessToken = '';
        String tokenEndpoint =  Site.getBaseSecureUrl() + '/services/oauth2/token';

        String payload = 'grant_type=urn%3Aietf%3Aparams%3Aoauth%3Agrant-type%3Ajwt-bearer&assertion=' + jwt;
        HttpRequest req = new HttpRequest();
        req.setMethod('POST');
        req.setEndpoint(tokenEndpoint);
        req.setHeader('Content-type', 'application/x-www-form-urlencoded');
        req.setBody(payload);
        Http http = new Http();
        HTTPResponse res = http.send(req);

        // get said access token from the response
        if ( res.getStatusCode() == 200 ) {
            System.JSONParser parser = System.JSON.createParser(res.getBody());
            while (parser.nextToken() != null) {
                if ((parser.getCurrentToken() == JSONToken.FIELD_NAME) && (parser.getText() == 'access_token')) {
                    parser.nextToken();
                    accessToken = parser.getText();
                    break;
                }
            }
        }
        // present the access token to frontdoor to get a session
        if (String.isNotBlank(accessToken)) {
            return new PageReference(Site.getBaseSecureUrl() + '/secur/frontdoor.jsp?sid=' + accessToken + '&retURL=' + retURL);
        }

        throw new AuraHandledException('Invalid or Expired Magic Link');
}
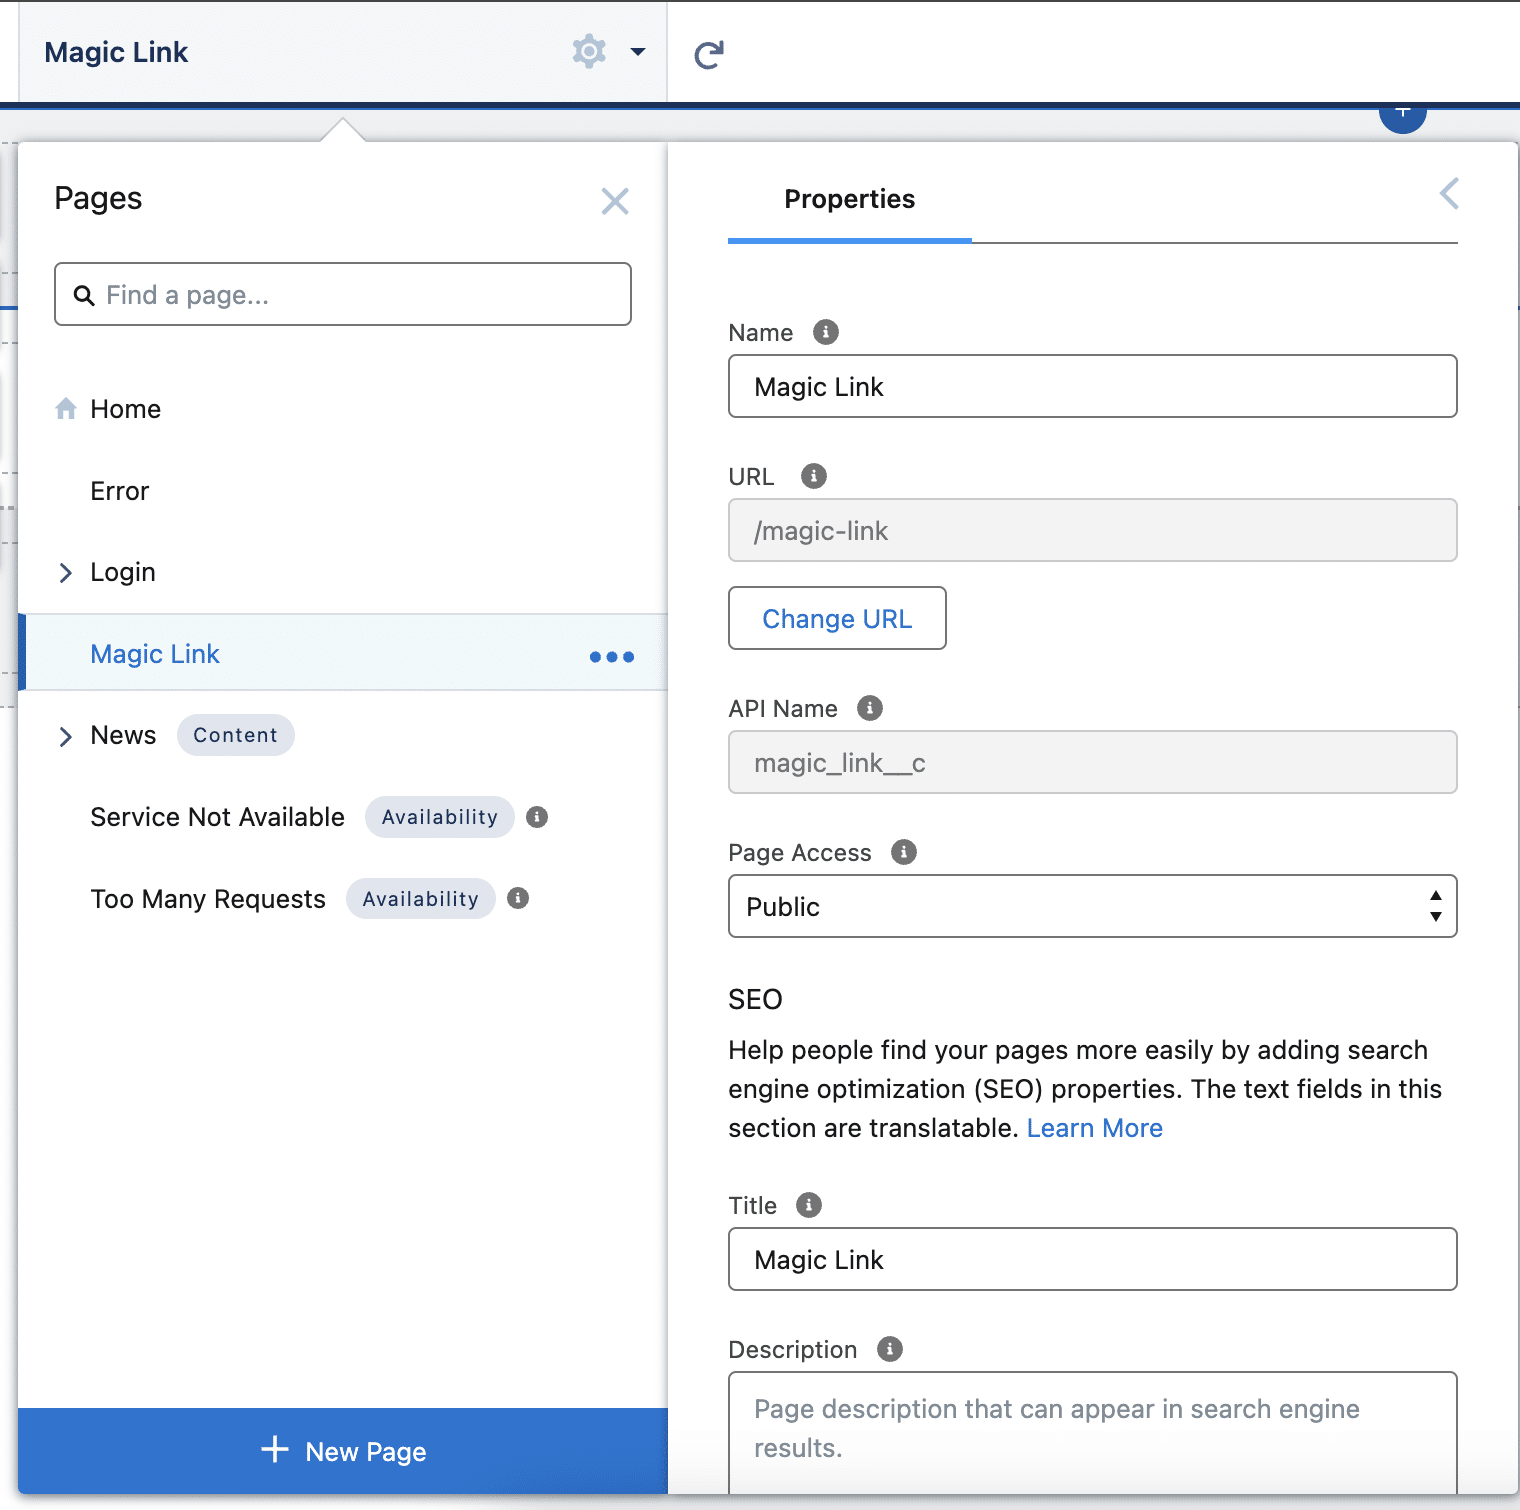
Now we need to create a page in out Experience Site with public access:

5. Publish Site
We are all set now! You can now generate links in following structure and users will be auto-authenticated and redirected to desired page:
https://your-community-url.com/magic-link?token=JWT&retURL=RELATIVE_URL_TO_OPEN

Salesforce Consultant & Architect, Business Applications, Business Processes and Technology Consulting, Entrepreneurship. More than 15 years working on the CRM and Salesforce Ecosystems.


© 2025 Nubessom All Rights Reserved