In this article, we will talk about the benefits of Salesforce, as a single platform to manage data throughout your company’s Sales, Marketing, Service and even Operations cycles.
A Salesforce Connected App is a representation of a third-party application that has been integrated with Salesforce using the Salesforce Platform APIs.
Connected apps allow external applications to securely access Salesforce data and functionality through the use of standard protocols such as OAuth 2.0. Once connected, the external application can access and manipulate data within Salesforce, such as creating new records or reading data from existing ones. Connected apps also allow Salesforce administrators to manage and monitor the access and usage of the external application, including revoking access if necessary.
While the Connected App is a powerful feature it is a nightmare to manage them across different lower environments that are frequently refreshed, as you must coordinate your efforts with 3rd parties since every refresh will bring a fresh set of Client Id’s and Secrets they would need to update.
We all know that the Connected Apps can be hosted anywhere and if you know the Client ID’s, Client Secrets and callback URL is configured correctly, you can use that Connected App from any environments you need.
That is the reason we came up with the Connected App Hub concept. Connected App Hub is a separate environment which is hosting all your Connected Apps for use by lower environments. This concept makes sure that with the refreshes we’re not losing the client ID’s and you don’t need to reconfigure 3rd part again.
Firstly, we are creating a dev environment from a Production Dev Hub. It’s a simple develop org that will host are app package in 1GP.
To set up the package we go to Setup, type “Package Manager” and click on it. For demo purposes “Demo Package” has been created.

This package will include all the connected apps that will be in the environment.
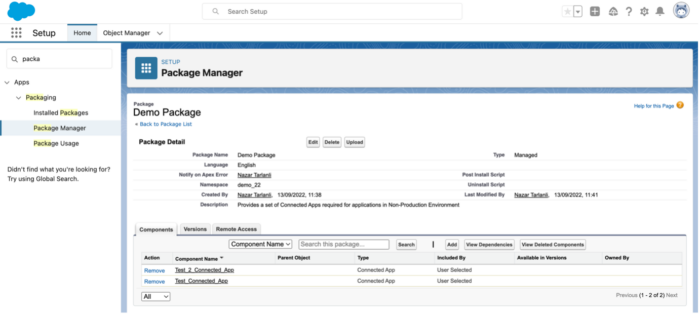
They are propagated with the install so if we add a connection up here, we will have to upload the new version and then update that new version in the environment.
Go ahead and create a connected app as you would in a normal environment.
It is suggested to add prefix to connected apps name to make sure it is different from the name, which was refreshed from Production, because we cannot have the same name Connected App in a single environment even though one is part of the package the other one is not part of the package, Salesforce still treats them as one and package installation will fail.
There are a couple of things to note here on the level of configuration that we are doing in the connected hub.
Some configurations are done with the hub:
● Selected OAuth scopes
● Callback URLs
● Configure the ID token
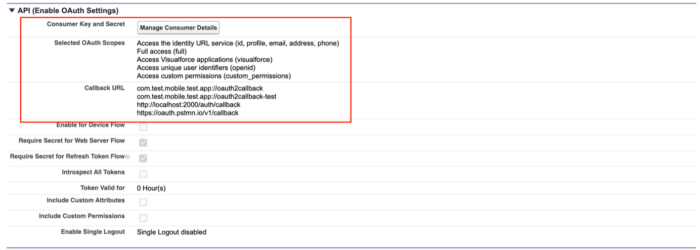
And some are done in the org post package installation:
●Custom Attributes
●Custom Connected App Handler
And the reason for this is because this environment just hosts the Connected Apps, it doesn’t have the plugin class, custom fields that are created on the user that are used for the custom attributes so we cannot add them here and they must be added on the environment (post install).
Manage configurations are not updated in the environment even if you configure them in the dev hub environment. As we can see there are proper permission settings and refresh token policy, but it is not reflected on the installed environments at all, and we must set the manually again post install.

So, the main 3 things that we should worry about in the connected app hub are:
ID token, can be configured both in the hub and in the environment. If the attribute uses standard field and is reusable then it is best to add it in the hub to make sure it is post install.

Given already created Connected App:
As soon as you add it to the package it doesn’t mean that it’s automatically available in the environments, we must upload the new version. To start uploading we need to set up configurations:
● Version Name – means that you must provide the version name. We suggest putting the dates the actual date when you create a new package version.
● Release Type – “Managed” otherwise we will not be able to update it and we will
● Click “Upload” at the bottom of the screen.
Uploading will take some time but at the end it will give us a version number and installing so this is the install link.
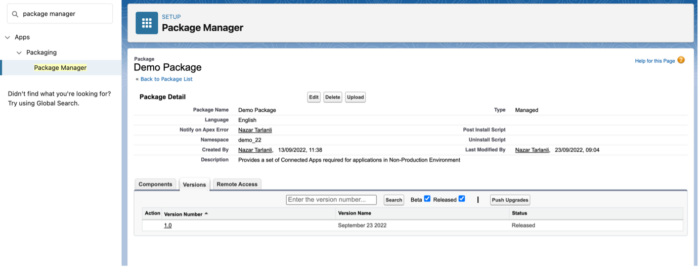

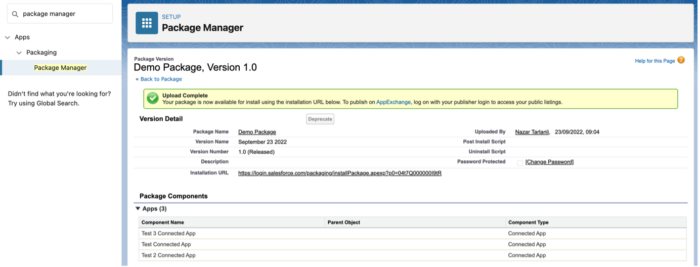
Copy install link starting from /install… In our case the path will be http://packaging/installPackage.apexp?p0=04t7Q000000I9tR
Add copied path to any environment you want these connected apps to be available on and install.
We can check list of our Connected Apps by clicking on “View Components”:

Use the installation link acquired from Package Upload:
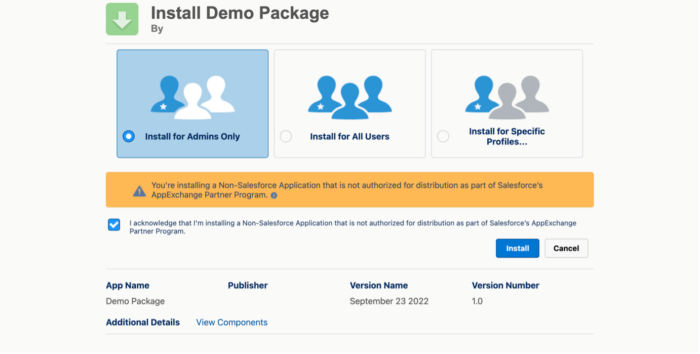
Installation can take a long time so you will receive an email after installation. To check installed apps, we should go to App Manager.
Once we find our connected app in App Manager, we will not be able to Edit it but only Manage. It means we can change:
●Permitted Users policies
●Refresh Token Policy
●We can add Plugin Class
●We can add Custom Attributes
You also have profile and permission set access If you are using public app make sure you provide valid permission and profiles otherwise people will not be able to access it.
And that is all for now folks!
Hope this detailed guide helps you build your own Salesforce Connected App Hub. If you have any questions or challenges ahead please reach us by clicking here or just fill out the form below.
In Nubessom we have more than 15 years helping companies around the world achieve their Salesforce, CRM and business automation needs.

With years of experience in MuleSoft and Salesforce development, Nazar has honed his skills in creating efficient and effective solutions for his clients. He is passionate about his work and is always willing to go the extra mile to ensure that his team is successful.


© 2024 Nubessom Consulting All Rights Reserved